Squash Unit


OBJECTIVE
Students will be able to make art with squash seeds
Students will be able to compare the amount of seeds in three different squash
Students will be able to taste a recipe made with squash
ESSENTIAL QUESTIONS
What are squash?
What can we do/make with squash?
What is the lifecycle of a squash plant?
PROCEDURE
Week one- Squash Dissection
Materials:
- 3-4 different types of squash (acorn, butternut, buttercup, delicata, and pumpkins are good ones)
- Knife
- Cutting board
- A bowl for each squash
- Spoons
- Plastic tablecloth
Introduction: Many kids cut open a pumpkin at school or at home around Halloween. Ask the students if they’ve even cut open a pumpkin before. What does it look like inside? Is it wet or dry? What’s inside? (Seeds!) What do pumpkin seeds look like? What color/shape are they? Show them the squashes and ask if they know what these are. Some will think they are different kinds of pumpkins. Explain that they’re called squash! The reason they might look like pumpkins is because a pumpkin is a type of squash. Ask the students if we can eat pumpkins. If they say no, ask them if they eat pumpkin pie. Pumpkin pie has pumpkin in it, and since we can eat squash, we can also eat pumpkin! Ask them which squash they think will have the most seeds.
Activity:
- Introduce each type of squash and tell the kids its name. Ask them what they think it
will look like inside. If they aren’t sure, remind them what a pumpkin looks like inside. Will the squash’s insides look the same as a pumpkin’s? What color will it be when we cut it open? - Cut open the first squash. Show the kids the insides. What does it look like? Does it have seeds?
- Cut the squash into quarters and give each child a piece and a spoon. Let them scoop out the guts and put the seeds in the bowl. Ask them if the seeds look like pumpkin seeds.
- When dissecting each squash, compare the insides and the seeds to the other squashes. Collect the seeds in a different bowl and compare them side by side. Some squashes have bigger or smaller seeds, but they’re all similar looking.
Wrap up/ Assessment: At the end, look in each bowl and decide which squash had the most seeds. Do these seeds look like pumpkin seeds? Why do we think that is? What should we do with these seeds- eat them? Plant them?
Week two- Seed Mosaics
Materials:
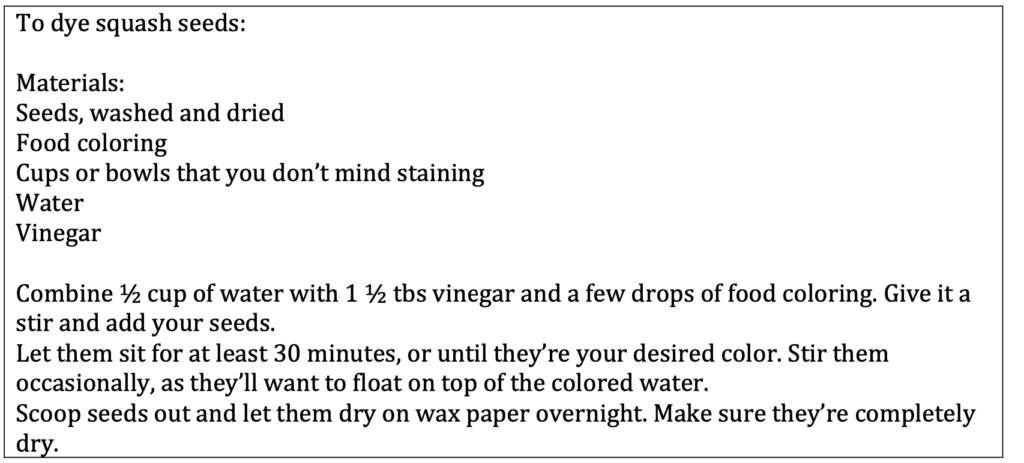
- Dyed squash seeds
- Elmer’s glue in cups
- Paint brushes to spread glue
- Cardboard cut into 4X4 square or other design
- Example mosaic
Introduction: Show the students the dyed seeds, and ask if they know what they are. Try to help them remember where we got these seeds- what vegetable did we cut open to find them? Explain that these are the squash seeds we collected last time, that I took home and dyed different colors so that today we can make art with them!
Activity:
- Show the kids the example mosaic, and explain that we’re going to first put glue on
our paper, then stick seeds onto the glue. Remind them that these seeds are for art not for eating. - Let the kids add glue and seeds to their cardboard to make a mosaic.
Wrap up/ Assessment: Ask students whether all these seeds look the same. Remind them that usually the big squashes had the biggest seeds, and the small squash had small seeds.
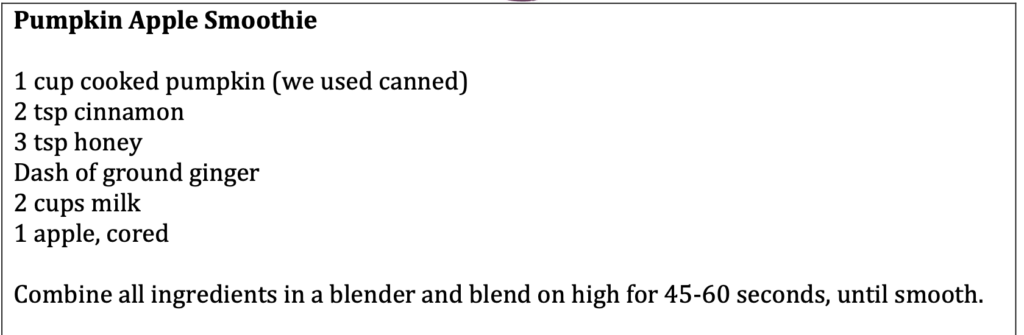
Week three- Pumpkin Smoothie
Materials:
- Cooked pumpkin (canned is easiest)
- Cinnamon
- Honey
- Ground ginger
- Milk
- Apple
- Measuring spoons and cups- smaller to make more jobs
- Can opener
- Blender
- Cutting board
- Apple corer
- Kid friendly knives
- Rubber spatula
- Recipes to send home
- Cups
Introduction: Ask students if they remember what type of vegetable we’ve been learning about. Remind them that pumpkin is a squash. Ask them if we can eat pumpkin. If they say no, remind them that pumpkin pie- and lots of other foods- have pumpkin in them, and pumpkin is a food we can eat! Explain that today we’re going to make a pumpkin smoothie- it’s delicious and tastes just like pumpkin pie.
Activity:
- Introduce the ingredients. Let the kids guess what’s in the can based on the picture
on the label. If kids seem unsure about eating pumpkin, ask them if they like apple,
milk, and honey. If they like those things, they’ll probably like this smoothie! - Start by coring the apple. Give each child a cutting board and a few slices to chop up
and add to the blender. - Open the can of pumpkin and show it to the kids. Let them smell it if they want.
What does it smell like? Take turns scooping pumpkin into the blender with the
rubber spatula. - Let the kids take turns holding the measuring cup, fill it up with milk, and let them
pour it into the blender. - Let the kids squeeze the honey into the blender. Pass around the ginger and
cinnamon so the kids can smell them, then let them add a few shakes to the blender. - Blend the ingredients in the blender for at least 45 seconds. Check on it, and if it
looks too thick, add more milk and blend some more. If the smoothie is too thick, it
will look unappetizing and the kids will be much less likely to taste it. - Pour the smoothie into cups and taste!
Wrap up/ Assessment: While tasting the smoothie, ask if they can taste the pumpkin, apple, and honey. What about cinnamon and ginger? Remind them that there’s pumpkin in this smoothie, which is something we don’t eat very often. How does it taste? At the end, ask the group to raise their hands if they tried it. Then raise their hands if they liked it.